
Have you ever caught yourself scrolling through your feed, utterly mesmerized by those gorgeous hair transformations that seem to pop up everywhere?
From the sun-kissed balayages to the bold ombre effects, there’s one style that’s making waves and catching eyes: T-Section Highlights.
Now, if you’re wondering what this trend is all about, imagine this: a touch of lightness and depth, just where you need it, giving your hair that “I just returned from a sunny vacation” vibe. Celebs and influencers are all over this trend, and for good reason—it’s like your hair got its own little spotlight!
But don’t worry, you don’t need a glam squad to get in on the action. We’re here to tell you all about T-Section Highlights and even show you how to achieve this look from the comfort of your home.
Whether you’re a seasoned DIY hair enthusiast or a first-timer looking to spice things up, we’ve got you covered.
Table of Contents
- What Are T-Section Highlights?
- What Are T-Bar Highlights?
- What the difference between full-head highlights and T-section?
- What’s the difference between T-section highlights and half-head?
- How do you do T section highlights?
- Watch and learn: how to do the T-section technique.
- T-section highlights before and after.
- TOP TIPS
- How long do T section highlights take?
- How long do T-section highlights last?
- Parting words
What Are T-Section Highlights?
T-section highlights are when a section of hair is lightened along your parting and crown at the top of your head.
These are great for lightening up your hair color while making it seem like you have more volume. So they’re particularly fab for fine hair peeps.
That said, they suit most face shapes and hair types.
T-section highlights are brilliant idea if you’re looking for highlights without having to have your whole head processed.
Or if you’re hair is already highlighted and you just need to touch up your darker roots.
Another benefit is that they’re very affordable.
This technique doesn’t cost as much as opting for all over color because it’s less time consuming and uses less product.
What Are T-Bar Highlights?
T-Bar highlights are another name for T-section highlights.
A T-bar is when you apply highlights across the parting and front sections of your hair, leaving the back of your hair uncolored.
It’s the best way to refresh already highlighted or blonde hair to restore it’s brightness and bounce!
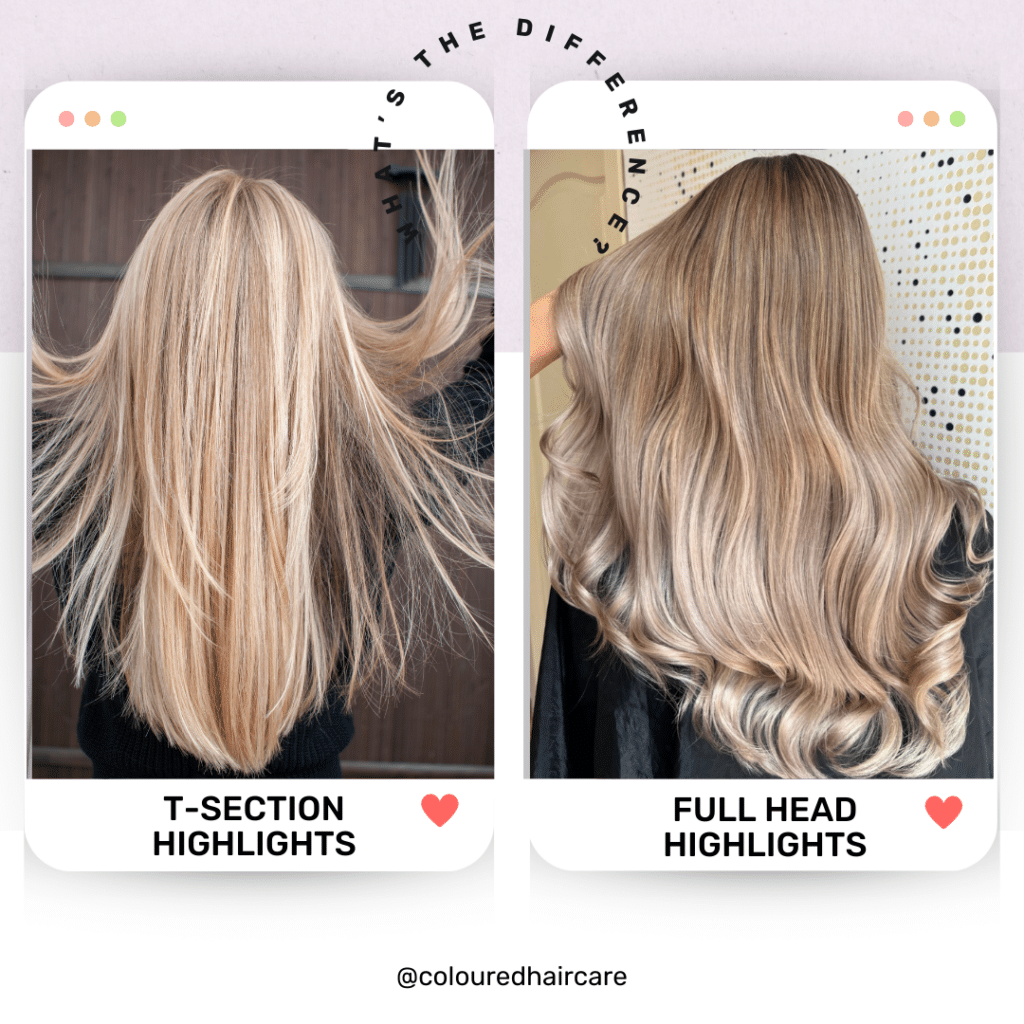
What the difference between full-head highlights and T-section?
The difference between full head and T-section highlights is all in the time and application.
A full head of highlights is a much more expensive and time-consuming process.
It involves your hair being washed, dried and color processed in small sections with foils– so it takes longer to do.
Once you have a full head, this technique is what you’ll have done every 6-8 weeks when your new roots start to show through.
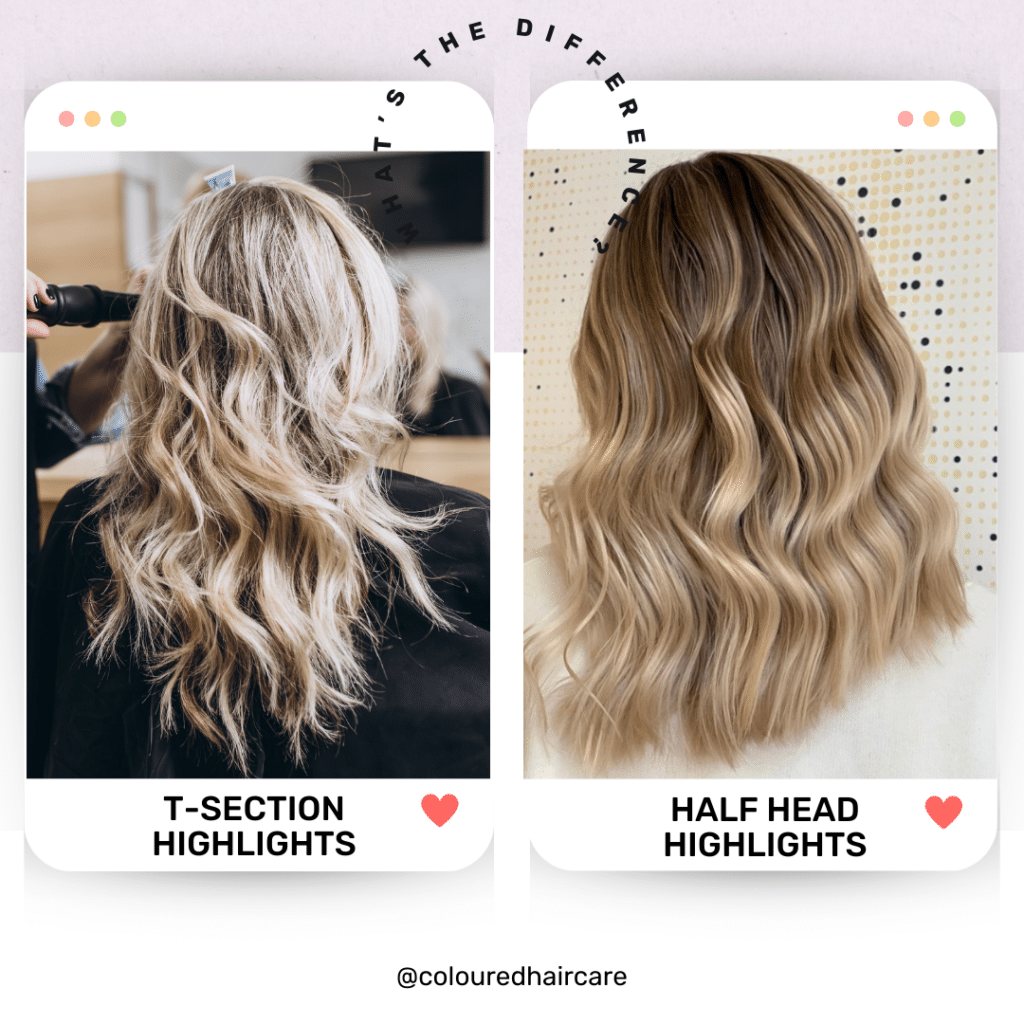
What’s the difference between T-section highlights and half-head?
A half head of highlights involves less color processing and is done on the underneath section of your hair.
It’s also ideal for lightening up just the top layer to create more volume – so it’s great for fine or thin hair.
T-zone highlights are still done in sections too, but are lighter all over to create a sun kissed look.
These are great for any skin tone too because they don’t have as much contrast between the base color and the highlighted strands. Brown hair with blonde highlights is a classic combination.
How do you do T section highlights?
Look, it’s not easy to highlight your own hair at home!
It’s an art and best left to the professionals who will know how to apply the right shades and colors for you.
Hairdressers have the experience needed to customize the right hair colors to get this look right every time.
As well as helpful additions such as foils that will ensure your color doesn’t drip all down your face!
But if you’re feeling brave, you can grab a highlighting kit and follow our step by step process below!
Step 1: Prepare!
Start by parting your hair in yout T zone where you want to have your lighter strands.
You can have them all one colour or a mixture of two or three colours.
If you’re going for a brighter look, opt for a lighter base colour and more colourful strands as the top layer.
The more you go for, the less blended it’ll look.
Step 2: Section your hair with foils
Cover the strands you want to highlight in formula from the highlight kit as instructed and place them in foils.
Apply blobs of colour all along your parting and crown applying directly from root to tip.
Make sure all of the strands are well covered by the foil before setting them with heat (for about 20-30 seconds).
Don’t touch or move them until they’ve cooled down – that way they won’t move and lose their shape.
Step 3: Leave to develop
Leave the highlight product in for as long as instructed on the kit.
Keep an eye on it – check your hair is developing as you would like.
You may need to leave it in for less time – or more!
Step 4: Rinse and style!
When ready, wash your hair as normal using a colour protecting shampoo and conditioner.
Dry as normal to reveal your newly highlighted locks!
Watch and learn: how to do the T-section technique.
Here’s a great video tutorial that guides you through how to do T-section highlights step by step.
T-section highlights before and after.
TOP TIPS
1. Start with clean dry hair– any product residue will stop the foils from sticking to the strands effectively and give an uneven application.
2. If you’re applying these to your whole head, start by doing a strand test first– that way you’ll know what colour result to expect if they turn out too dark or light.
3. You can highlight your hair yourself at home or have a friend help out- just watch the video to see how to get it right!
4. Make sure you’re using heat protection products before highlighting your hair – this will stop the foils from melting and burning your strands.
5. Use clips to section off parts that you don’t want to highlight for easier application and to keep them out of the way.
How long do T section highlights take?
It depends on how many sections you choose to highlight.
How long it takes will also depend on the length of your hair.
But as an estimate you’re looking at at least 2-3 hours from start to finish
The more foils you place in, the more time consuming it will be.
So see how many sections work best for your hair’s colouring needs!
How long do T-section highlights last?
You can expect half head highlights to last around six weeks before your roots start to need touching up.
If you want a longer lasting effect, opt for a full head or even Balayage, which will take you up to three months before needing retouching.
Keep your colour bright and dazzling by using a good purple shampoo to tone your hair and keep brassiness at bay – particularly if you have blonde highlights.
You can also use toner to darken your highlights if they’re looking way too blonde and bright!
Your hair will also be pretty dry and damaged after processing, so make sure you use shampoo and conditioners for damaged hair.
Along with a good deep conditioner to restore and replenish moirsure. to your strands!
Parting words
With just a little bit of knowledge and some careful planning, you can get the perfect T-section highlights at home.
Remember to always go one shade lighter than your natural hair colour so that it blends seamlessly with your base colour.
We hope this article has been helpful in helping you learn how to highlight your own locks!
